BZT Fräse/en

ℹ️ New to the CNC mill?
If you are using the BZT for the first time, please work through this page from top to bottom. The video playlist What is CNC milling? is a good introduction to the topic.
ℹ️ What can you mill?
The BZT PFK 1607 PX is a gantry mill for wood and wood-based materials, plastics such as acrylic, PE or Styrodur, soft aluminum and composites such as GFRP, CFRP or circuit boards.
- Travel: X = 1666 mm, Y = 750 mm, Z = 250 mm
- Clamping area: 1910 × 750 mm
- Spindle: 1.0 kW, 3,500 – 24,000 rpm
- Collets: ER20, for shank diameters from 2 to 13 mm
- Software: vCarve (toolpaths), cutting data calculator (spindle speed and feed rate), USBCNC (machine control)
🚨 Important
Use only after an induction. You can find dates (in a group or individually) at Induction BZT mill.
Determine spindle speed and feed rate with the cutting data calculator (Schnittdatenrechner) and always check the values in vCarve – errors can also creep into the tool database.
Always use the collet that matches the end mill shank – otherwise the end mill, collet and spindle can be damaged.
Always place a spoilboard under the material.
The controller must always stay switched on.
🛡️ Safety
🔥 In an emergency
End mill breaks, material comes loose or the mill moves into a clamp
- Press the emergency stop immediately
- Notify the Happylab team
- This video shows what to do after an emergency stop:
⚠️ Before every start
- ✔ Machine table and slots cleaned with the vacuum cleaner?
- ✔ Spoilboard placed underneath and material clamped at at least 4 points?
- ✔ Suitable collet used and checked for damage?
- ✔ Checked that the milling paths do not lead into the clamps?
- ✔ Safety goggles and hearing protection on? Both are provided in the workshop.
- ✔ No loose clothing, no jewelry, long hair tied back?
- ✔ Stay at the machine while milling and do not reach into the working area.
🧹 After working
- There is no extraction – clean the machine, table and surroundings with the vacuum cleaner after milling
- Remove the end mill from the collet
- Put clamps, screws and slot nuts back
- Remove material and spoilboard leftovers
🎬 Video tutorials
What is CNC milling?
You will find the videos for the individual work steps directly at the steps further down.
🧭 Process overview
Choose end mill and cutting data → Create toolpaths (vCarve) → Clamp the end mill → Clamp the material → Start the machine and set the origin → Check the clamping → Mill → Clean up
🔩 Step 1: Choose end mill and cutting data
Which end mill for which material?
You can get end mills in the 24/7 shop – you can see which are currently in stock in the shop overview in the Members Portal.
Spiral flutes or straight flutes?
- Spiral end mills have helical cutting edges like a drill bit. They cut evenly and carry the chips out of the slot – that is why they are the standard for most work, for deep slots, plastics and aluminum. Because they pull the chips upwards, the top edge can fray slightly and thin material can be lifted. Good clamping is especially important here.
- End mills with straight flutes cut without pulling up or down. This gives clean edges on the top and bottom of wood-based materials such as plywood or MDF, and thin sheets do not lift. On the other hand, the chips are removed less well: it is better to mill in several shallow passes.
| End mill in the shop | Suitable for | Tip |
|---|---|---|
| End mill, single flute | Soft materials: plastics such as PE, Teflon, acrylic, Styrodur, soft aluminum grades | Lots of space for the chips – plastic is therefore less likely to melt, and the contours come out very clean |
| End mill, two flutes | Wood-based materials, harder plastics, harder aluminum | Universally usable, the standard end mill for most work |
| Two-flute end mill with straight flutes | Plywood, MDF, solid wood | Clean edges on both sides, thin sheets do not lift |
| Roughing end mill | Removing a lot of material quickly, e.g. large pockets | The surface becomes rough – then finish with a normal end mill (finishing) |
| Ball nose end mill | 3D surfaces and reliefs, fillets | For a smooth surface, choose a small stepover |
| Engraving bit 30° | Engravings, fine lettering and lines, V-carving | The deeper you mill, the wider the line becomes. The fine tip breaks easily – only use small cutting depths |
| Chamfer bit 90° (V-groove bit, 2 flutes) | Chamfering edges, V-grooves, V-carving of larger lettering | The groove becomes twice as wide as it is deep |
| Diamond-cut end mills | GFRP, CFRP, circuit boards and other composites, wood | The many small cutting edges chop up the fibers instead of tearing them out |
All end mills are available in different diameters.
Spindle speed and feed rate
You calculate spindle speed and feed rate with the cutting data calculator – it is installed on the PC next to the mill. You enter these values in vCarve. How to install it at home is described under Further information.
💻 Step 2: Create toolpaths in vCarve
With vCarve 12 you create the toolpaths for 2.5D and 3D milling. You can import 2D vector files (e.g. EPS, SVG, PDF, AI, DXF, DWG) and 3D models (e.g. STL, OBJ, 3DS, SKP).
Installation, license and all further info: VCarve info (in German)
- Import our tool database:

|
BZT Werkzeugdaten 2026.zip (28KB) [info] Tool database for VCarve Pro |
- Import the file – 2D drawings preferably as EPS (see below).
- Create the toolpaths and enter spindle speed and feed rate from the cutting data calculator for each tool, or compare the values from the tool database against it.
- Save the milling file.
⚠️ Import EPS instead of DXF
When importing DXF files (e.g. from CorelDRAW), vCarve takes over the shape correctly, but creates a great many nodes along the lines. So it is better to import EPS files.
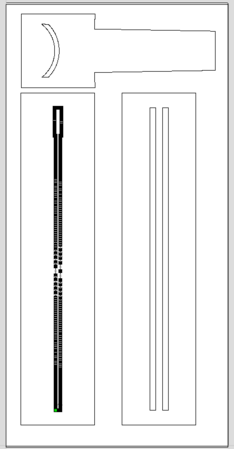
DXF import: very many nodes
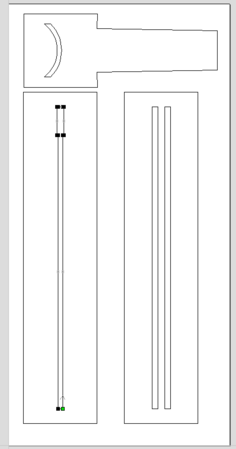
EPS import: clean lines
.PNG)
.PNG)
Alternatively, you can also create the toolpaths with Fusion.
🔧 Step 3: Clamp the end mill
The collet holds the end mill absolutely straight and firmly in the spindle. If it sits crooked or loose, it wobbles while rotating: the part becomes inaccurate, the end mill vibrates (chatter), wears out faster and can break.
The lab has ER20 collets for shank diameters of 2, 3, 4, 5, 6, 7, 8, 9, 10, 11, 12 and 13 mm.
- Choose the collet that fits the shank diameter of the end mill exactly.
- Check the collet for damage (see below).
- First click the collet into the collet nut, then screw the nut loosely onto the spindle.
- Insert the end mill – as deep as possible, but clamp it only on the shank, never on the cutting edges.
- Tighten the nut. If you need extreme force for this, the collet is probably broken.

How do you recognize a broken collet?
- Scratches and grooves inside: The end mill has slipped in the collet (galling marks).
- Worn-out opening: The front is widened, the end mill sits crooked or wobbles.
- Missing clamping force: The collet no longer springs open properly, and the nut has to be tightened extremely hard for the end mill to hold.
- Rust or dirt: Stains or small holes prevent the collet from sitting smoothly.
Do not use a damaged collet – give it to the Happylab team instead.
🗜️ Step 4: Clamp the material
- Clean the machine table and slots with the vacuum cleaner.
- Place the spoilboard on the table and the material on top of it.
- Slide slot nuts with screws into the slots of the table. If a slot nut jams, vacuum out the slot or use a different slot nut.
- Clamp the material with clamps, washer and wing nut at at least 4 points – usually at all corners.
The slot nuts are 3D-printed. We replace damaged slot nuts on an ongoing basis. The print file for the Prusa MK3S: Slot nuts BZT CNC (.rar)
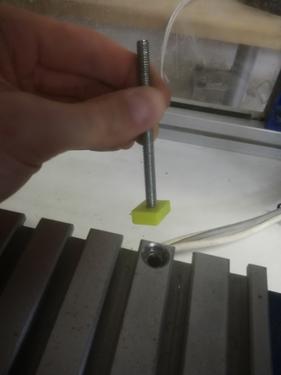
Slot nut with screw
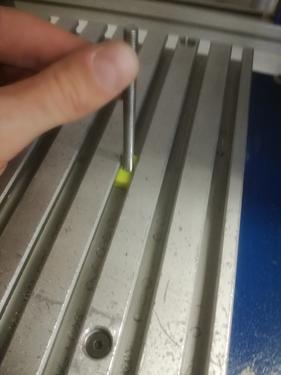
Slide the slot nut into the slot of the table
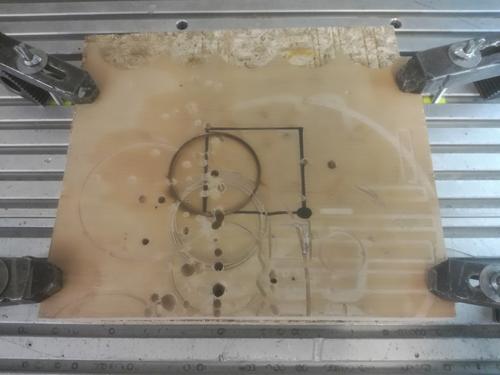
Spoilboard and material, clamped at 4 points
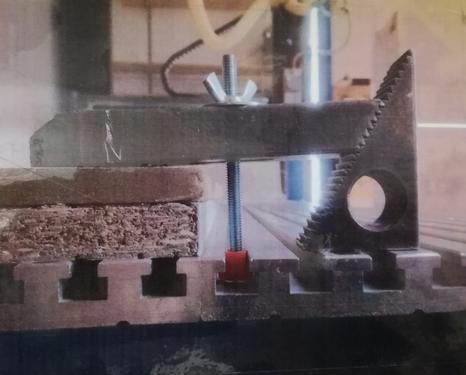
Clamp with washer and wing nut

.jpg)


📍 Step 5: Start the machine and set the origin
Switch on the machine and home it
How to switch on the mill, open USBCNC and home the machine is shown in the induction video from minute 25:10:
Set the origin
In the Jog menu, use the handheld controller to move the end mill to the point where your origin should be, and confirm it with the red button on the handheld controller. The origin must match the point you set in vCarve. In the video, the black dot on the material marks the desired origin.
🔍 Step 6: Check the clamping
Before you start, check whether the end mill would run into a clamp on its path:
- Load the milling file in USBCNC. The blue lines show the milling paths in the workpiece, the yellow line the current position of the end mill.
- In the Jog menu, move to each clamp one after the other.
- If the yellow line lies on a blue line in the process, the end mill would run into the clamp. Then move the clamp or the origin.
▶️ Step 7: Milling
You start the job with the green start button in USBCNC. At a tool change the machine stops: you change the end mill manually, then the new tool is measured.
Pause the job
- Turn the handwheel in the MINUS direction until the axes stop and the software shows 0 %.
- Press the red button – the spindle stops rotating.
Resume the job
- First switch the spindle back on in the software (top left).
- Press the green start button in the software.
- Turn the handwheel in the PLUS direction until the software shows 100 % feed rate again on the right.
✅ Your first milling job
Checklist
☐ End mill chosen to match the material
☐ Spindle speed and feed rate determined with the cutting data calculator and entered in vCarve
☐ Toolpaths created and saved
☐ Suitable, undamaged collet used, end mill firmly clamped
☐ Table cleaned, spoilboard placed underneath, material clamped at at least 4 points
☐ Machine homed, origin set
☐ Moved to all clamps – none lies in the milling path
☐ Safety goggles and hearing protection on, job started
☐ Machine vacuumed, workstation tidied up
❓ Troubleshooting
| Problem | Possible cause / solution |
|---|---|
| End mill chatters, wobbles or breaks | Collet does not fit or is damaged; check spindle speed and feed rate with the cutting data calculator |
| Slot nut does not slide into the slot | Vacuum out the slot or use a different slot nut |
| Material shifts during milling | Clamp at more points, retighten the clamps |
| Milling path leads through a clamp | Move the clamp or the origin |
| Imported lines have very many nodes | Import the file as EPS instead of DXF |
| Emergency stop was pressed | See In an emergency |
If you have questions, our Lab Managers will help you during the front desk service hours.
📖 Further information
💻 Software
vCarve 12
All info on installation and license: VCarve info (in German). You will find the tool database in Step 2.
vCarve on Linux: We recommend Bottles. You can find detailed instructions here (in German). Configuration file for the bottle:|
|
Bottles_vCarve-32bit.zip (1KB) [info] Config files to import into Bottles |
Fusion
A very powerful CAD/CAM program from Autodesk. Free for private, non-commercial use and for students.
- Post processor: If you also generate the G-code in Fusion (CAM), select eding.cps as the post processor. You can open the resulting files directly in USBCNC.
- Tool database:
|
|
Werkzeuge_für_Fusion.zip (1KB) [info] Tool database for Fusion |
- Guide from Openlab Hamburg (in German) – a good reference for the BZT
- Fusion tutorial for absolute beginners, Autodesk Fusion YouTube channel
Measuring the tool: For this, the following code was added to the standard post processor eding.cps:
if (tool.manualToolChange) {
      onCommand(COMMAND_STOP);
      writeComment("MANUAL TOOL CHANGE TO T" + toolFormat.format(tool.number));
      writeBlock(
            mFormat.format(5), // M05 - Stop spindle
            mFormat.format(9)  // M09 - Turn off coolant
        );
      writeBlock(gFormat.format(0), "Z" + xyzFormat.format(20.320)); // G00 Z20.320 - Rapid move to safe Z height
      writeBlock("T" + toolFormat.format(tool.number), mFormat.format(6)); // T1 M06 - Tool change
      writeBlock(gFormat.format(43), hFormat.format(tool.number)); // G43 H1 - Apply tool length compensation
    }
Available as a separate file: Datei:Eding with tool measure.cps.zip
Then a tool measurement is performed, as with vCarve.
Cutting data calculator
Calculates spindle speed and feed rate for your end mill and your material (Schnittdatenrechner). It is installed on the PC next to the mill. For home use: Download the cutting data calculator (alternatively on the Sorotec download page under Fräsparameter).
Other CAM programs
- Estlcam – simple, very good commercial software, trial version available
- FilouNC – commercial software, trial version available
- CamBam – commercial software, trial version available
📚 Learning materials
- Presentation for the CNC induction (in German)
- Checklist from a member: German / English – originally written for a different location, individual steps may differ
- "Das dicke CNC-Buch" (in German) – free download
- Cutting data for reference: Sorotec cutting value table (in German), Online calculator from Cenon (in German). For the BZT, the values from the cutting data calculator apply.
- Useful tools: Generate G-code for thread milling (in German), Create a dovetail with vCarve Pro
📊 Technical data
| Model | BZT PFK 1607 PX |
| Type | Gantry mill |
| Travel | X = 1666 mm, Y = 750 mm, Z = 250 mm |
| Max. clamping area | X = 1910 mm, Y = 750 mm |
| Drive | 3 stepper motors, 4.2 A |
| Programmable resolution | 0.0025 mm |
| Repeatability | approx. ± 0.02 – 0.03 mm |
| Max. backlash | approx. 0.04 mm (corrected in the software to below 0.01 mm) |
| Rapid traverse | approx. 8000 mm/min |
| Max. working speed | approx. 4000 mm/min |
| Spindle | HF spindle 1.0 kW, 3,500 – 24,000 rpm |
| T-slot table | Slot width 8 mm, slot spacing 25 mm |
| Collets | ER20 |
🔗 See also
- CNC drilling of circuit boards (in German)
- CNC milling of circuit boards (in German)
- Archive of the old CNC mill (in German)
💶 Costs / Prices
💶 Current prices
You can find the current prices for machines, memberships and consumables on the Happylab website.
👉 Prices
Happy milling!