Vinylplotter Graphtech/en

ℹ️ New to the cutting plotter?
If you are using the vinyl cutter for the first time, please work through this page from top to bottom.
ℹ️ What can you cut?
The Graphtec CE7000-130 cuts the contours of vector graphics into film – only the film, the backing material underneath stays intact. Afterwards you remove the unwanted film parts (weeding) and transfer your design onto an object or a textile. A pen can also be used instead of the blade.
- Adhesive film (PVC): stickers, lettering and logos for glass, walls, vehicles, etc.
- Flex and flock film: designs for T-shirts and other textiles – applied with the heat press
- Cutting width: max. 1270 mm
- Material thickness: max. 0.25 mm
- Films: you buy them self-service in the 24/7 shop. You can see which films are in stock in the Members Portal.
🚨 Important
Use only after an induction or after passing the online test. You can find dates and the online test at Cutting plotter induction.
Always use Cutting Master 4 (CM4) for cutting – Cutting Master 5 does not work reliably.
Do not cut paper, cardboard or rubber mats. To cut all the way through them, you would need a carrier sheet, which we do not have – without it, the cutting strip is damaged. The laser cutter is suitable for paper and cardboard.
Do not change any basic settings on the plotter – especially not the step size, otherwise all cuts will be distorted.
🛡️ Safety
🔥 In an emergency
Film slips, jams, or the blade cuts into the backing material
- Press the PAUSE button on the plotter immediately
- If in doubt, notify the Happylab team
⚠️ Before every start
- ✔ Visual check: is the plotter in proper condition?
- ✔ Blade checked and set correctly?
- ✔ Material suitable (film with backing material, max. 0.25 mm)?
- ✔ Do not reach into the plotter while it is cutting – the cutting head moves fast and can pinch your fingers. The plotter can also be damaged.
🧹 After working

- Remove the film and set all levers up so that the pinch rollers are relieved
- Dispose of film leftovers, clean the workstation
🎬 Video tutorials
Operating the plotter
Software
Transferring stickers with transfer film
🧭 Process overview
Prepare the design (CorelDRAW) → Check the blade → Insert the film → Set the origin → Test cut → Cut (Cutting Master 4) → Weed → Transfer (transfer film or heat press)
🎨 Step 1: Prepare the design in CorelDRAW

The plotter cuts every line of your graphic – fills and colors do not matter. So prepare your file like this:
- Draw or import the design in CorelDRAW (vector graphic, e.g. SVG, AI, PDF, EPS).
- Convert text to curves (Ctrl+Q).
- Merge overlapping objects – e.g. letters of a script font that run into each other. Otherwise the plotter also cuts the lines inside.
- Only for flex and flock film: mirror the design! The film is cut from the back. Without mirroring, your design will be backwards on the textile after pressing.
- Use the Outline view (upper command bar) to check which lines will actually be cut.
Very small details and thin lines are hard to weed and come off easily – it is better to make them a bit larger.
🔪 Step 2: Check the blade
The blade may only protrude far enough to cut through the film, but not the backing material.
- Take the blade holder out of the clamp.
- Check whether film residue is stuck to the blade and carefully remove it.
- Check the blade length: run your fingertip over the tip. It should feel like the tip of a toothpick (guideline: 0.2 mm, see Material settings).
- If necessary, turn the black wheel: in one direction the blade retracts, in the other it extends.
- Clamp the blade holder back in.
📥 Step 3: Insert the film
- Set the main lever at the back right (behind the control panel) up – the photo under After working shows where it is. Now the pinch rollers and the cutting head can be moved by hand.
- Insert the film – film on top, backing material at the bottom:
- Adhesive film: colored film on top, backing paper at the bottom
- Flex film: matte side on top, glossy carrier film at the bottom
- Position the pinch rollers: all rollers must be over the material and exactly at the blue markings – otherwise the plotter reports an error and does not start.
- Set the pressure of the individual rollers: outer rollers to strong (small lever all the way down), middle rollers to medium (small lever in the middle).
- Set the main lever at the back right down. Now rollers and head are locked – do not move anything by hand any more.
Cutting only takes place between the two outer rollers.
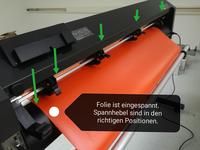
Clamping the film
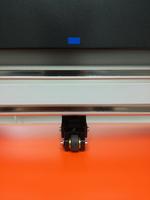
Pinch rollers exactly at the blue marking


📍 Step 4: Detect the material and set the origin
After lowering the main lever, the plotter asks how the material should be detected. There is no reference run. Select on the control panel:
| Key | When to use? | What happens? |
|---|---|---|
| 1 | Film from a roll | The plotter measures the width and searches for the front edge. The starting point is the bottom right corner. |
| 2 | Film stays where it is | The plotter only measures the width and starts at the current position. |
| 3 | Small piece of film | The plotter measures the whole piece. |
Set your own starting point: Use the arrow keys to move to the desired position and press ORIGIN. This is now the new origin.
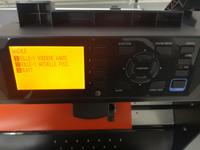
Setting the origin

✂️ Step 5: Settings and test cut
Set force and speed
- Press the COND/TEST key.
- Set Speed and Force according to the table below.
- Go back with ENTER/MENU.
Make sure that tool setting 1 (blade) is selected. Setting 2 is for the pen.
Test cut
- Use the arrow keys to move the cutting head to a free spot on the film.
- Press COND/TEST.
- Left arrow key: a single test pattern is cut with the set force.
- Right arrow key: three test patterns side by side – on the left one force level weaker, in the middle the set force, on the right one level stronger.
- Weed the test patterns and evaluate them:
- Good: the film can be peeled off cleanly, at most a slight imprint is visible in the backing material.
- Film is still connected: increase the force.
- Backing material is cut through: reduce the force or extend the blade less.
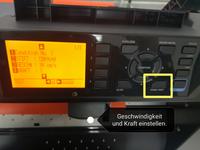
Set speed and force, make a test cut
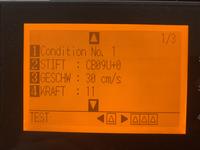
Basic setting for flex and sticker films


⚙️ Material settings
All values are guideline values. Always do a test cut and adjust the values if necessary.
| Material | Blade length (mm) | Speed | Force | Note |
|---|---|---|---|---|
| Adhesive film PVC (24/7 shop) | 0.2 | 30 | 11 | |
| Flex film PE (24/7 shop) | 0.2 | 30 | 11 | |
| Flex film PE aqua green (24/7 shop) | 0.2 | 25 | 15 | Deviates from the general values – might also help with other colors |
| Stahl's Cad-Cut Glitter, flex film PVC | – | – | – | No values yet: start with the flex values and adjust with a test cut |
| Flock film | approx. 0.4 | 25 | – | Only the thin adhesive layer has to be cut, the fibers underneath are not connected. If the blade is extended too far, the corners are torn out. Determine the force with a test cut. |
💻 Step 6: Cutting with Cutting Master 4
- Select the objects to be cut in CorelDRAW.
- In the upper command bar (middle/right), select Plot/Cut (CM4). Do not use CM5!
- Cutting Master 4 opens. Do not close this window, only minimize it – the program communicates with the plotter, nothing is edited in it.
- In the General section, click the ? symbol. The plotter then reports the actual size of the loaded film.
- In the Position section, adjust the position and orientation of the design on the film.
- In the Advanced section, enable the weeding frame: a frame is also cut around your design, which makes weeding easier.
- Click Send to start the cut.
To interrupt, press the PAUSE key on the plotter.
You can page through the pictures for the individual steps with the arrows:
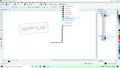
Step 2: In CorelDRAW, select "Plot/Cut (CM4)"
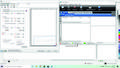
Step 3: Do not close the Cutting Master 4 window, only minimize it
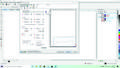
Step 4: Under "General", use the "?" to query the film size from the plotter
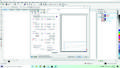
Step 5: Under "Position", place the design on the film
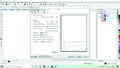
Step 6: Under "Advanced", enable the weeding frame


🧩 Step 7: Remove the film and weed
- Use the VIEW key to advance the film a bit and cut off the cut part.
- Weeding: peel off the unwanted film around your design and in the gaps. It is best to start at a corner of the weeding frame.
Adhesive film: transfer with transfer film
The transfer film is next to the plotter – feel free to take what you need. We appreciate a contribution to the honesty box (above the transfer film).
- Stick the transfer film onto the weeded design and press it down well.
- Peel off the backing paper – the design stays stuck to the transfer film.
- Stick the design onto the clean, dry surface and press it down firmly.
- Peel off the transfer film slowly and flat.
The video Transferring stickers with transfer film shows exactly how this works.
👕 Step 8: Press flex and flock film onto textile
- Place the textile on the heat press and pre-press for a few seconds so that it is smooth and dry.
- Place the design so that it is readable – the transparent carrier film is on top.
- Close the press and open it again after the signal tone.
- Peel off the carrier film – warm, hot or cold, depending on the film (see table).
- If specified, press again without the carrier film.
| Film | Temperature | Time | Pressure | Peel carrier film | Re-press |
|---|---|---|---|---|---|
| Flex film PE | 160 – 170 °C | 20 – 25 s | medium | warm | approx. 5 s |
| Flex film PVC | 150 °C | 10 – 15 s | – | cold | no |
| Stahl's Cad-Cut Glitter | 150 °C | 10 s | – | hot | 10 s |
| Nylon flex film | 150 °C | 4 s pre-press, 15 s re-press | low | – | – |
| Flock film | 170 – 185 °C | 25 s | medium | per manufacturer | per manufacturer |
These are guideline values – always also follow the film manufacturer's instructions.
✅ Your first plotter job
Checklist
☐ Text converted to curves, overlaps merged
☐ For flex and flock film: design mirrored
☐ Blade checked
☐ Film inserted the right way round, all rollers at the blue markings
☐ Main lever down, material detected, origin set
☐ Speed and force set, test cut made
☐ Sent with Cutting Master 4
☐ Weeded and transferred
☐ All levers up, workstation clean
❓ Troubleshooting
| Problem | Possible cause / solution |
|---|---|
| Plotter reports an error and does not start | Not all pinch rollers are over the material or not exactly at the blue markings |
| Film is not cut through | Increase the force, check the blade for residue and its length |
| Backing material is cut through | Reduce the force or extend the blade less |
| Corners tear out | Reduce the speed, clean the blade, for flock extend the blade less |
| Lines inside letters are also cut | Merge overlapping objects in CorelDRAW |
| Design is backwards on the T-shirt | Mirror the design before cutting |
| Small parts come off during weeding | Make details larger, peel slower and flatter |
| Cuts are distorted | Basic settings were changed – please inform the Happylab team |
If you have questions, our Lab Managers will help you during the front desk service hours.
📖 Further information
⌨️ Key overview

| Key | Function |
|---|---|
| COND/TEST | Set force and speed, test cut |
| ORIGIN | Set the current position as the origin |
| HOME | Move to the origin |
| VIEW | Advance the film a bit, e.g. for cutting off |
| PAUSE | Interrupt the cut |
| ENTER/MENU | Back to the main menu |
| Hold ENTER + 1 / 2 | Select tool setting for blade (1) or pen (2) |
🧪 For advanced users
- Segments (Cutting Master 4): splits large designs that do not fit on the film into several pieces.
- Registration marks: for contour cutting of already printed film. The marks must already be on the film. The plotter reads them in by itself – if it cannot find them, you move there with the arrow keys and have it search again.
- Extend cutting area (menu AREA): allows cutting up to 1 cm beyond the outer pinch rollers. Only use in exceptional cases.
📊 Training presentation & technical data
→ Presentation for the vinyl cutter training (in German)
- Model: Graphtec CE7000-130
- Max. cutting area: 1270 mm × 50 m
- Material width: 50 – 1372 mm
- Max. material thickness: 0.25 mm
- Max. cutting force: 450 g
- Max. speed: 1000 mm/s
- Mechanical resolution: 0.005 mm
- Pens: fiber-tip pen (water-based), ballpoint pen (oil-based)
- Software: CorelDRAW with Cutting Master 4
💶 Costs / Prices
💶 Current prices
You can find the current prices for machines, memberships and consumables on the Happylab website.
👉 Prices
Happy plotting!