Prusa 3D Drucker/en

ℹ️ New to 3D printing?
If you are 3D printing for the first time, please work through this page from top to bottom.
The PDF Basics of 3D printing (in German) explains the most important basic terms.
ℹ️ What can you print?
The Prusa i3 MK3S+ is an FDM printer: it melts plastic filament and builds your object layer by layer.
- Material: PLA – PETG only when ordered via the Members Portal
- Build volume: 250 × 210 × 210 mm (W × D × H)
- Layer height: 0.05 – 0.3 mm
- Nozzle: 0.4 mm
- Recommended minimum wall thickness: 1.0 mm
- Number of printers: 6 printers in Vienna (Alpha to Foxtrot)
🚨 Important
Use only after an induction or after passing the online test. You can find dates and the online test on happylab.at.
The printers are used at your own risk. If a print fails, there is no refund.
Do not change any settings on the printers themselves (e.g. filament sensor, Z-offset / Live Adjust Z).
Only filament from Happylab may be used – do not load your own material.
Do not swap print plates between printers – they are calibrated exactly for their own printer.
🛡️ Safety
🔥 In an emergency
Smoke, smell of burning or unusual noises
- Stop the print immediately – in the web interface or at the printer (press the dial → Stop print)
- Notify the Happylab team
⚠️ Before every print
- ✔ Is the right filament loaded – and is the same material selected in PrusaSlicer? If you print on PLA with PETG settings, for example, the PLA melts far too much and the print head gets clogged.
- ✔ Print bed cleaned?
- ✔ Print plate placed correctly (aligned with the two pins at the back)?
🧹 After printing
- The nozzle (over 200 °C) and the heated bed stay hot for a while – do not touch
- Clean the print plate and put it back
- Dispose of brim, support material and filament leftovers
🎬 Video tutorials
The interface of the current PrusaSlicer version may differ slightly from the videos.
Prusa hardware
PrusaSlicer
🧭 Process overview
3D model → Slice (PrusaSlicer) → Print (web interface)
The slicer breaks your model down into layers and calculates the G-code from it – the movement commands for the printer. You upload this to the printer via the browser and start the print.
📐 Step 1: 3D model
You need a 3D file in the format STL, 3MF, OBJ, STEP or AMF. You design your own models in a CAD program, and you can download ready-made models – you will find suitable programs and platforms below under Further information.
💻 Step 2: Set up PrusaSlicer (one-time)
PrusaSlicer is installed on the 3D printing PC at Happylab. For your own computer: Download PrusaSlicer – please always use the current version.
On first launch, the configuration wizard guides you through the setup (it can be opened again later via Configuration → Configuration Wizard):
- Printer: Tick Original Prusa i3 MK3S & MK3S+ with 0.4 mm nozzle.
- Filaments: Tick the profiles for the materials you want to use:
| Material | Extrudr profile | Alternative Prusament | Note |
|---|---|---|---|
| PLA | Extrudr PLA NX2 | Prusament PLA | Standard material for your prints |
| PETG | Extrudr PETG | Prusament PETG | only when ordered via the Members Portal |
We use filament from Extrudr. If you would like to print in a different color or with a different material, please contact the Lab Managers.
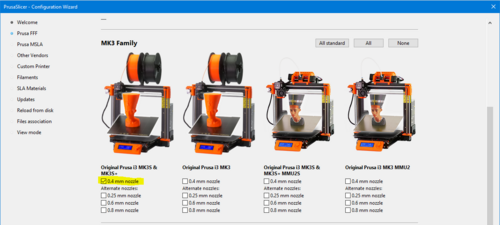
Printer profile Original Prusa i3 MK3S & MK3S+, 0.4 mm nozzle

Filament profiles from Extrudr


⚠️ Other slicers
Other slicers (e.g. Cura) are generally compatible with our printers. However, Happylab only offers support for PrusaSlicer – using other slicers is at your own risk.
✂️ Step 3: Slice the model
The menus in PrusaSlicer are given here with their English names.
Import the model
Drag and drop your file into PrusaSlicer or open it via File → Import (Ctrl+I).
The model lies on the print bed the way it was saved. If it is positioned badly, select Place on face (key F) in the toolbar on the left and click the face that should be at the bottom. A large, flat contact surface prints most reliably and needs fewer supports.
Position and size
With the key A (Arrange), PrusaSlicer arranges the objects automatically. If possible, place your object in the center of the print bed: the bed is cooler at the edge, so the print comes loose more easily there.
You can move, rotate and scale using the toolbar on the left (keys M, R, S) or via the values in the Object manipulation field on the right.
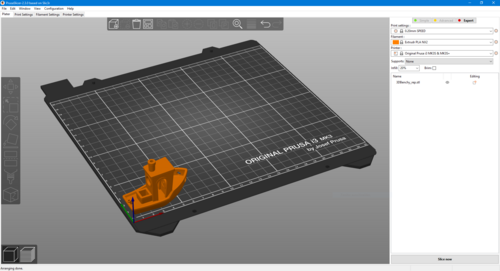
Not recommended: object at the edge
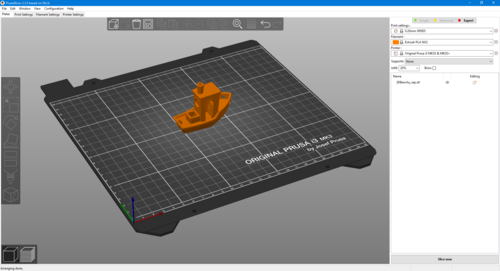
Recommended: object in the center of the print bed


Select profiles
At the top right you select three profiles:
- Print settings: To start with, 0.20mm QUALITY; for more detail, 0.15mm QUALITY. The lower the layer height, the longer the print takes. For very delicate objects, a finer setting helps because the printer moves more slowly. Do not use 0.05 mm for large objects.
- Filament: The profile of the material that is loaded in the printer (e.g. Extrudr PLA NX2).
- Printer: Original Prusa i3 MK3S & MK3S+
💡 Tip: Variable layer height
With the Variable layer height tool (upper toolbar) you print curved surfaces with fine layers and vertical surfaces with coarse ones. This saves time and costs without losing quality where it matters. Video about it
Support material (supports)
The printer cannot print overhangs in mid-air – they need supports. These are printed from the same material as the model and broken off after printing.
✅ Our recommendation: organic supports, from the print bed only
- On the right under Supports, select the option Support on build plate only.
- In the tab Print Settings → Support material, select Organic under Style. If the option is not visible, switch to Expert mode at the top right.
Organic supports grow like branches towards the model, touch it at only a few points and are easy to remove. Save the setting as your own preset so you do not have to set it again every time.
The option Everywhere also supports overhangs that lie above other parts of the model. These supports are often hard to remove and worsen the surface – only use it if necessary. More on this on the Prusa help page on support structures (in German).
Infill
Infill is the filling structure inside the model (0–100 %). More infill makes the part more stable, but needs more material and time. We recommend at least 15 %, because not every model can be printed with less: with the Benchy, part of the deck would be printed in mid-air at 0 %.
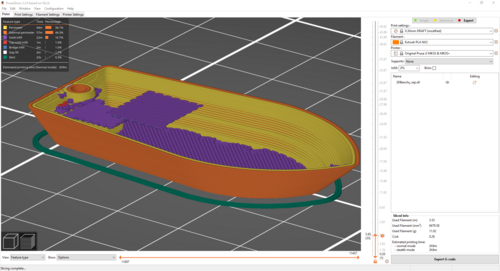
0 % infill: part of the deck would be printed in mid-air (purple area)
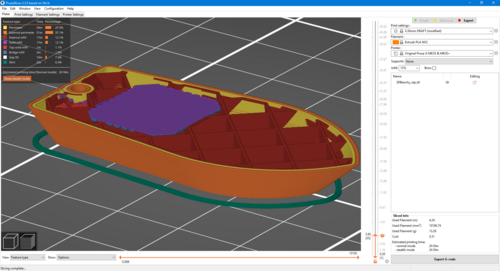
15 % infill: the deck has enough support underneath


Brim
If Brim is enabled, the printer prints a flat border around the model in the first layer. This improves adhesion – recommended for tall, thin objects and for a small contact surface. Simply break off the brim after printing.
Slice, check, export
- Click Slice now at the bottom right.
- Check the preview: with the slider on the right you go through the model layer by layer and can see whether parts would be printed in mid-air.
- At the bottom right you will see the estimated print time and the material consumption – you can use these to estimate the costs based on the price list.
- Save the .gcode file with Export G-code.
🖨️ Step 4: At the printer
The printers are always switched on – you do not need a membership card.
Check and change the filament
Check whether the desired material is loaded in the desired color. If not, you change it yourself:
Remove filament
- Press the dial at the bottom right of the display and select Unload filament.
- Select the material (e.g. PLA) – the printer heats up to the matching temperature.
- After the beep, press the dial: the filament is pushed out. Pull it out and secure the end on the spool so it does not unwind.
Insert filament
- Cut the filament end at an angle to a point with the side cutter – a thickened end cannot be inserted.
- Push the filament into the opening on the print head from above. The filament sensor detects it, the printer asks for the material if necessary and pulls the filament in automatically.
- Wait until the new color comes out of the nozzle cleanly and confirm on the display. Carefully remove any extruded material – the nozzle is hot!
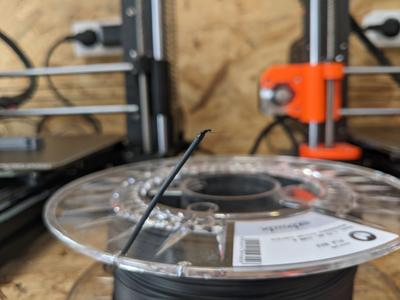
Wrong: filament not cut, "blob" at the end clearly visible
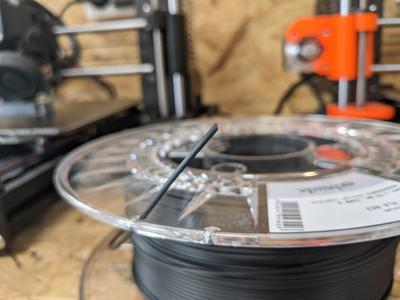
Right: filament cut to a point


Clean the print bed
Before every print, wipe the print plate with some paper and cleaning fluid from the dispenser. After that, do not touch the print surface with your fingers any more – skin oil worsens adhesion.
Please do NOT use glue sticks on our print beds (even though the Prusa Knowledge Base sometimes recommends it).
Start the print
Vienna
- Open the page of the printer you want to print on (only accessible from within the Happylab network):
- Log in with your Members Portal credentials.
- Upload the G-code and start with Print. Before that, check that you have really selected the printer you are standing at.
Bookmarks to import into the browser: Bookmarks_PRUSA.zip
What happens at the start
First the Z axis moves all the way up. It may hit the stop there and audibly keep trying to move – this is intended. Then the printer heats up and probes the print bed at several points with the P.I.N.D.A. sensor (auto bed leveling). Unevenness that arises during heating is compensated automatically this way.

Watch the first layer
Stay at the printer for the first few minutes: the first layer decides the whole print. The lines should be even, slightly flattened and adhere well to the bed. If they come loose or the printer pulls strings through the air: stop the print, clean the print bed and restart. If it does not work again, contact the Lab Managers – please do not change the Z-offset yourself.
Remove the print
- Let the print plate cool down after the print.
- Carefully lift the print plate off the heated bed (it is held magnetically).
- Bend the plate slightly – the print comes loose on its own. Do not use spatulas or similar, they damage the surface.
- Clean the plate again and put it back (align with the two pins at the back).
✅ Your first 3D print
Checklist
☐ Model imported and placed in the center with a large surface facing down
☐ Printer, print and filament profile selected
☐ Supports (Support on build plate only, Organic) and infill (at least 15 %) set
☐ Brim enabled if needed
☐ Sliced, preview checked, G-code exported
☐ Correct filament in the printer
☐ Print bed cleaned
☐ G-code uploaded and print started
☐ First layer watched
❓ Troubleshooting
| Problem | Possible cause / solution |
|---|---|
| Print comes loose from the bed, corners lift (warping) | Clean the print bed, place the object in the center, enable brim |
| Parts are printed in mid-air or sag | Enable supports, infill at least 15 % – check in the preview |
| Print head clogged, material oozes out | Wrong filament profile (e.g. PETG instead of PLA)? Stop the print and inform a Lab Manager |
| Print looks wrong overall | Check profiles: Original Prusa i3 MK3S & MK3S+ (0.4 mm nozzle), filament matching the loaded material |
| Large object fails or takes extremely long | Do not use a layer height of 0.05 mm for large objects |
| Repeated failed prints with transparent filament | Transparent filament is trickier – use a different color |
More tips: Prusa Knowledge Base – Print quality & troubleshooting (in German)
If you have questions, our Lab Managers will help you during the front desk service hours.
📖 Further information
🧪 Material properties
PLA
- Overview: What is PLA? (in German)
- PLA data sheet
- Complies with the requirements for children's toys, PLA food compliance
PETG
Chemical resistance of PLA & PETG
Note: The filament is approved for food contact – however, printed parts are not automatically food-safe as a result. Bacteria can collect in the fine grooves between the layers.
📦 3D models & tools
- Printables – 3D models to download (Prusa's platform)
- Thingiverse – 3D models to download
- TraceParts – CAD models of standard parts and industrial components
- MeshLab – edit and repair STL files (Win, Mac, Linux)
Simple scaling, cutting (Cut, key C) and simplifying of models can also be done directly in PrusaSlicer.
✏️ CAD programs
- Tinkercad – very simple, ideal for beginners and children. Browser-based, Autodesk account required.
- SketchUp Free – easy-to-use drawing program. Browser-based.
- Autodesk Fusion – professional CAD/CAM for Win and Mac. Free for private, non-commercial use, Autodesk account required.
- FreeCAD – powerful 2D and 3D CAD. Open source, Win, Mac, Linux.
- OpenSCAD – text-based modeling, interesting for anyone who has already done some programming. Helpful extensions are offered by the libraries such as BOSL2. Open source, Win, Mac, Linux.
- Blender – actually 3D animation software, with excellent sculpting tools for organic shapes. Open source, Win, Mac, Linux.
💬 Help & community
💶 Costs / Prices
💶 Current prices
You can find the current prices for machines, memberships and consumables on the Happylab website.
👉 Prices
Happy printing!